Assigning a Workflow
This section covers:
Assigning a Workflow
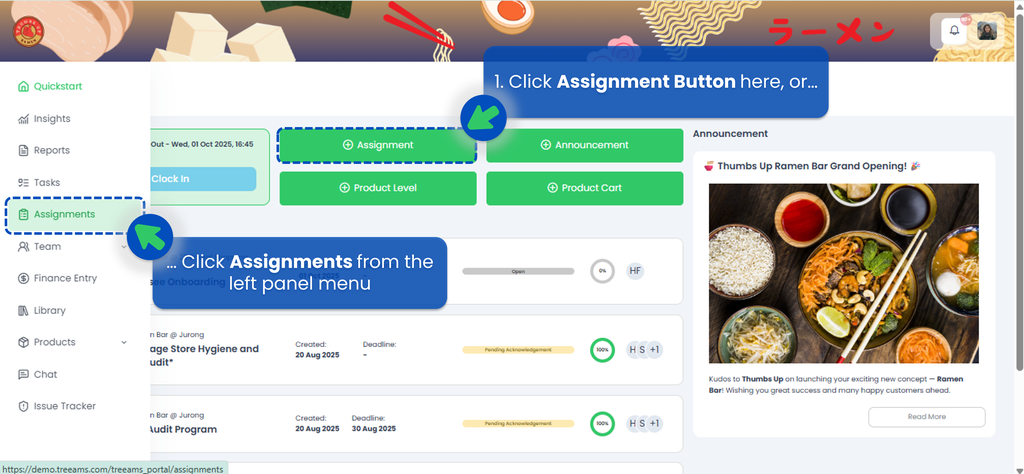
- From the Portal, click Assignments. You can find Assignments from the left panel menu or from the Quickstart page.
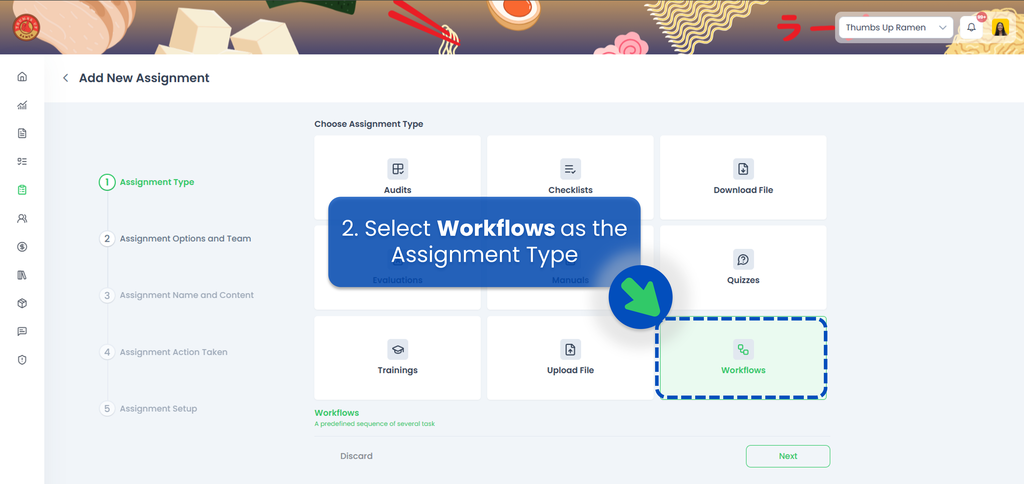
- Select "Workflow" as the Assignment Type, then click Next.
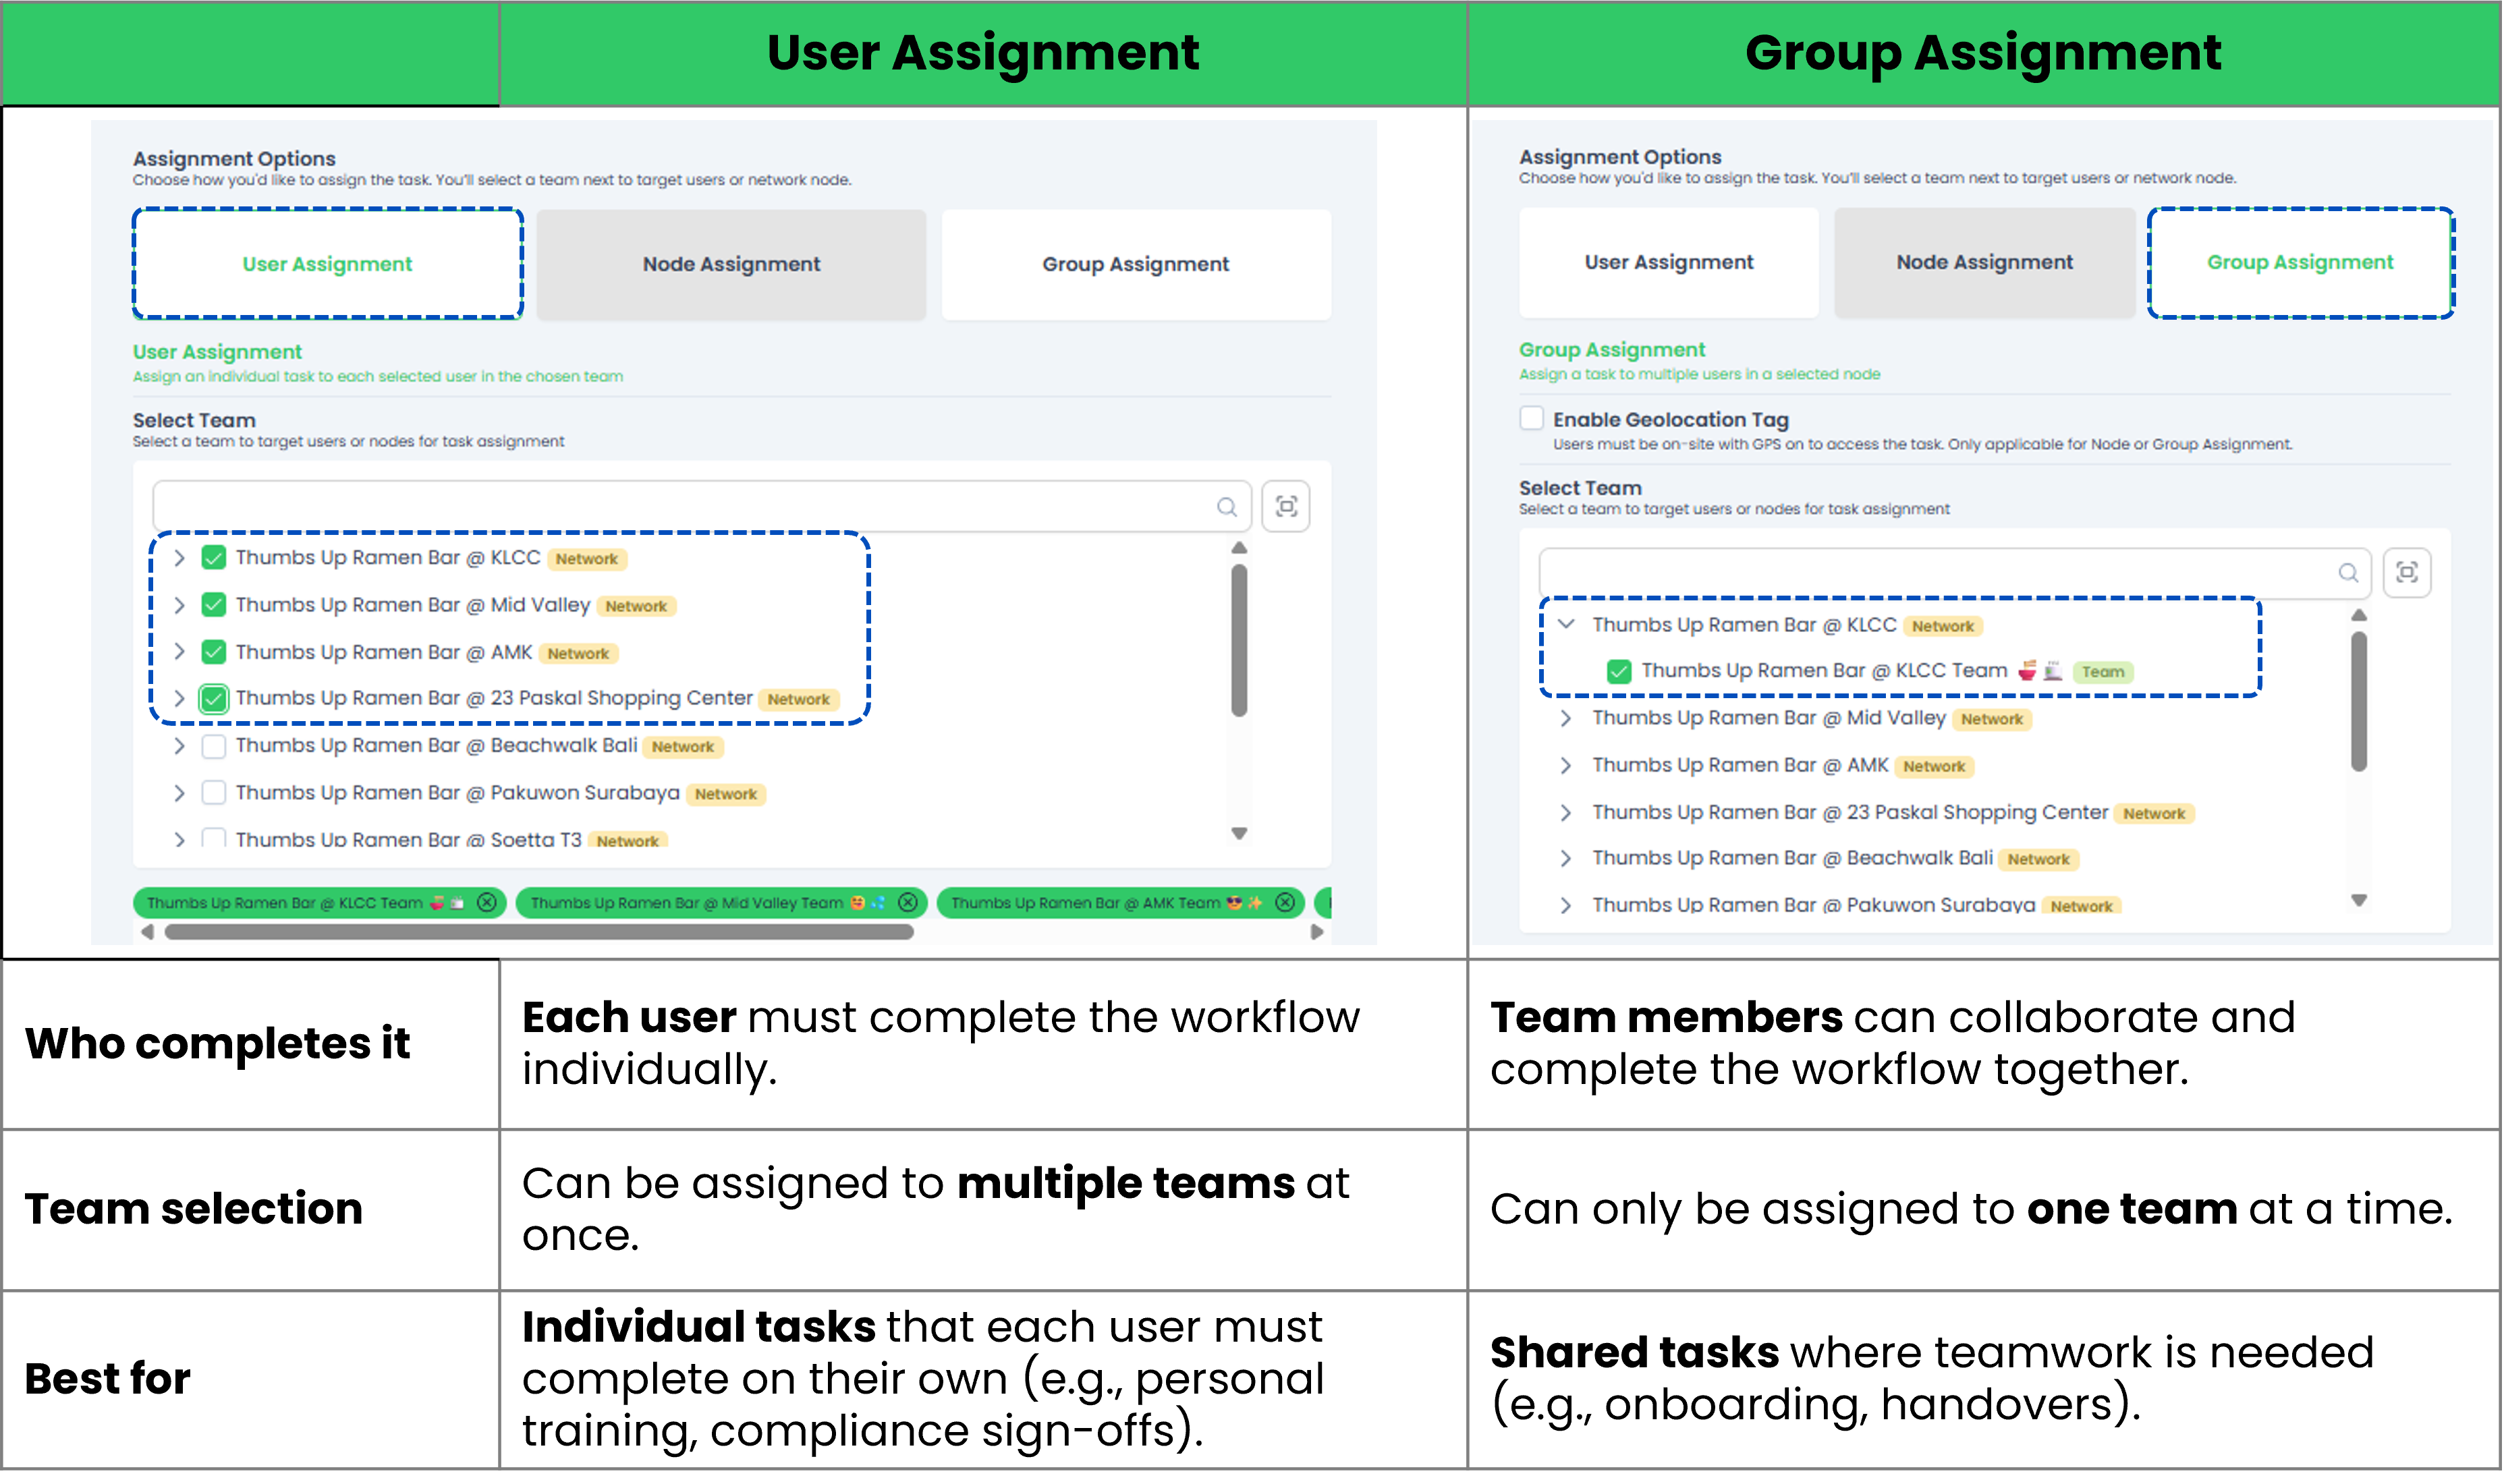
- Select the Assignment Option and the Team(s).
Before select a workflow content, determine which assignment option suits your use case:
- Select the Workflow you'd like to assign. If you haven't created one yet, refer to How to create and edit a Workflow first.

- Optionally, rename the workflow to something more specific (e.g., "New Employee Onboarding - August 2025"). If left blank, the system will use the content's name automatically. (Note: The title cannot be changed once assigned.)
- Click Preview to verify the content on mobile view, then click Next.
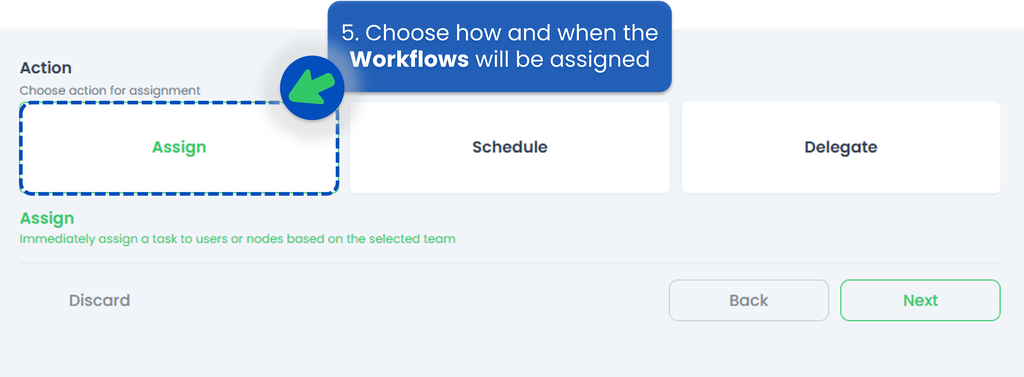
- Select an Action for how and when the Workflows will be assigned to the selected team or users, then click Next.
 Here is the explanation of each action. You can also refer to Assignment Action Taken for more detail.
- Assign Action 👉 Directly send the workflow to the responsible person. Use Delegate if you're unsure who that is.
- Schedule Action 👉 Set a recurring schedule to automatically assign the workflow at a regular frequency within a specific timeframe.
- Delegate Action 👉 Hand off the assignment to someone who can identify and appoint the right person to complete it.
- Fill up the Assignment Setup section.
- Select Co-Owners (Optional) 👉 A secondary user who can collaborate on the workflow but isn't the main assignee.
- Set Deadline (Optional) 👉 Set a due date for the workflow. If not set, the workflow stays active until manually completed. When set, assignees will be notified via email.
- Assign Users in Bulk 👉 means you select one user who must complete all steps in the workflow themselves. If you don't tick "Bulk Assign," you can assign different tasks to different users (e.g., Store Managaer does approval, Staff uploads files) and requires setting assignees per task.
- Select Assignees & Reviewers:
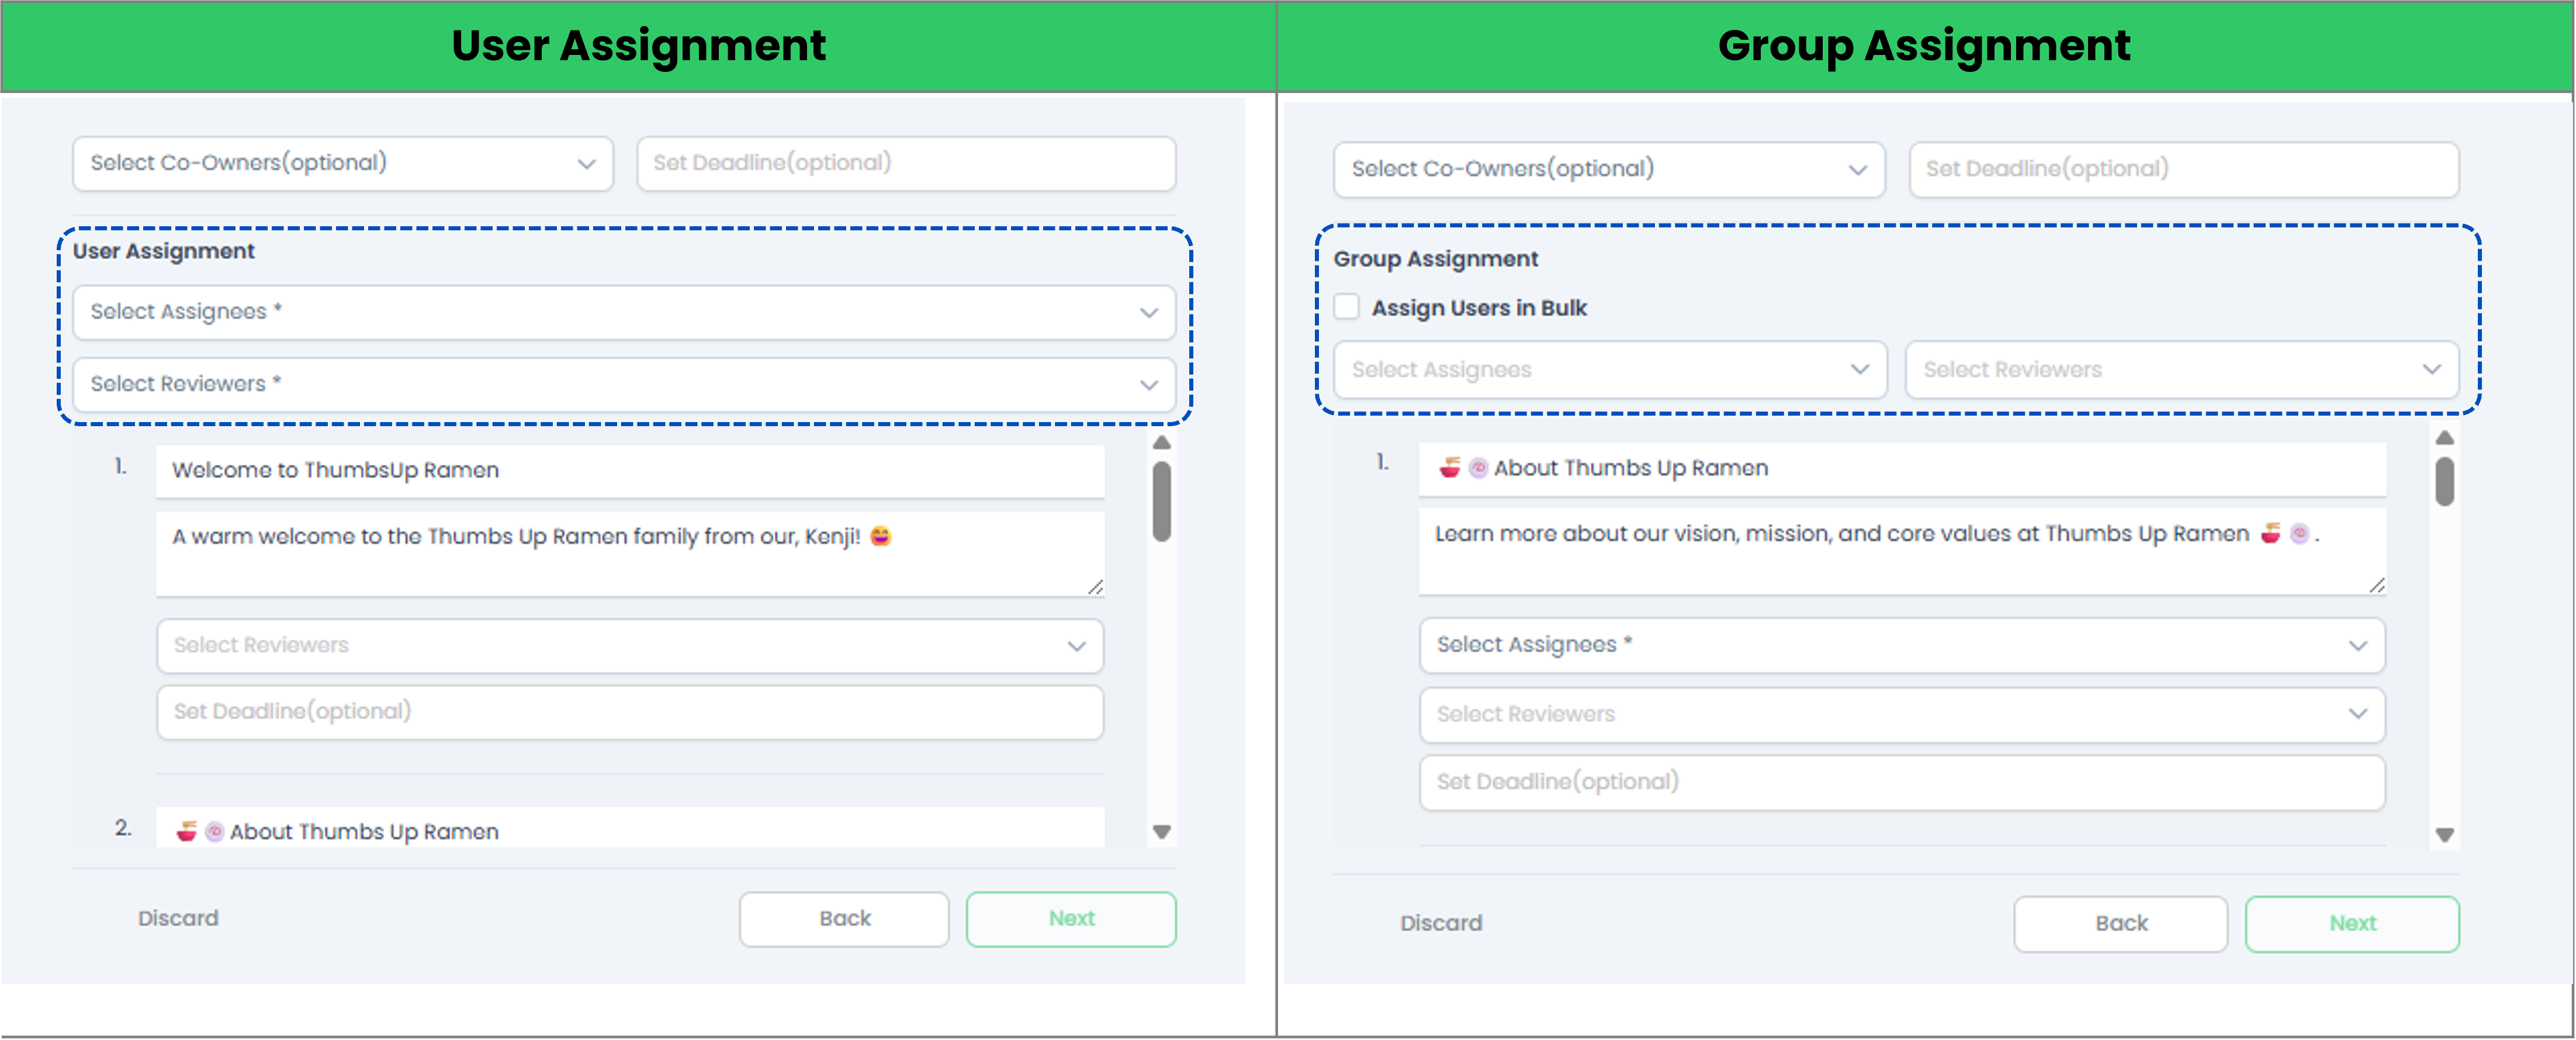
- User Assignment 👉 assignees and reviewers are selected once and applied across all tasks in the workflow.
- Group Assignment 👉 assignees and reviewers are set per individual task. Tick Assign Users in Bulk to skip per-task selection and apply one assignee to all tasks at once.
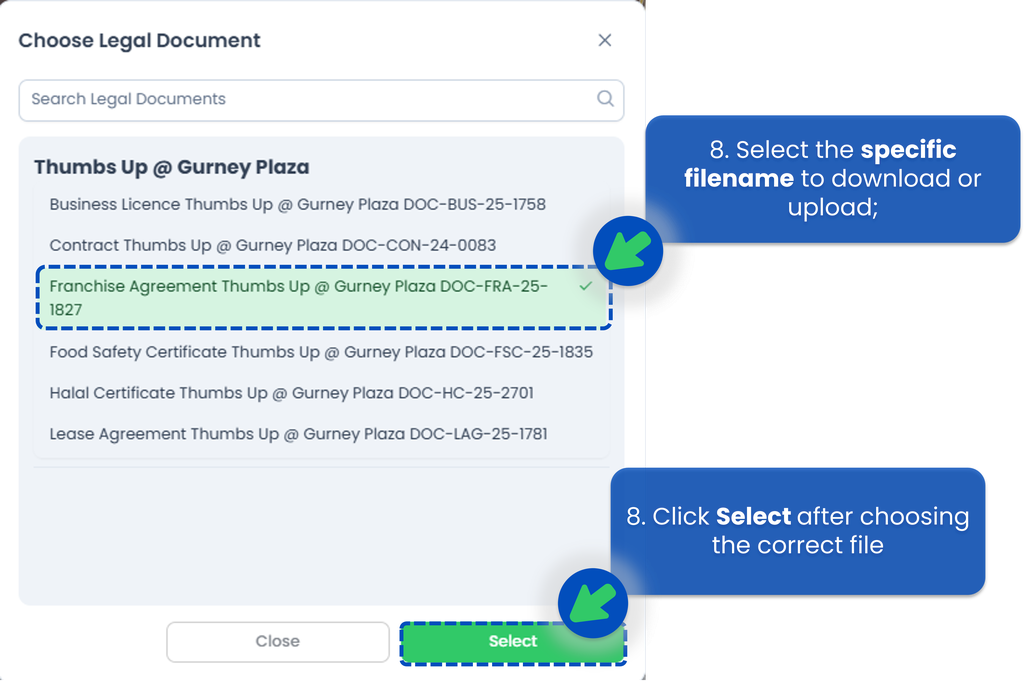
- File Handling (For Download or Upload Content).
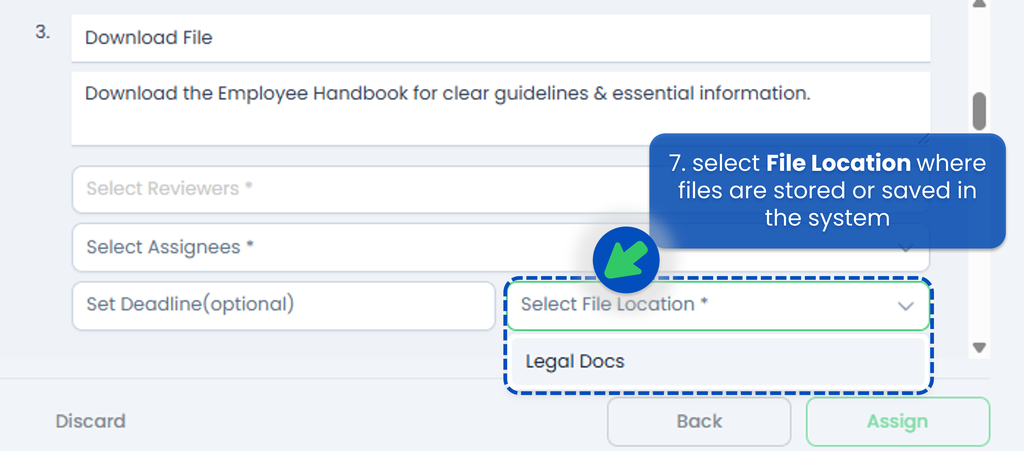 If the workflow involves files, select File Location where files are stored or saved in the system. After clicking on the chosen location, the system will prompt you to select the specific filename to download or upload.
- After all set, click "Assign" to send the workflow to the selected users.
Schedule a Workflow
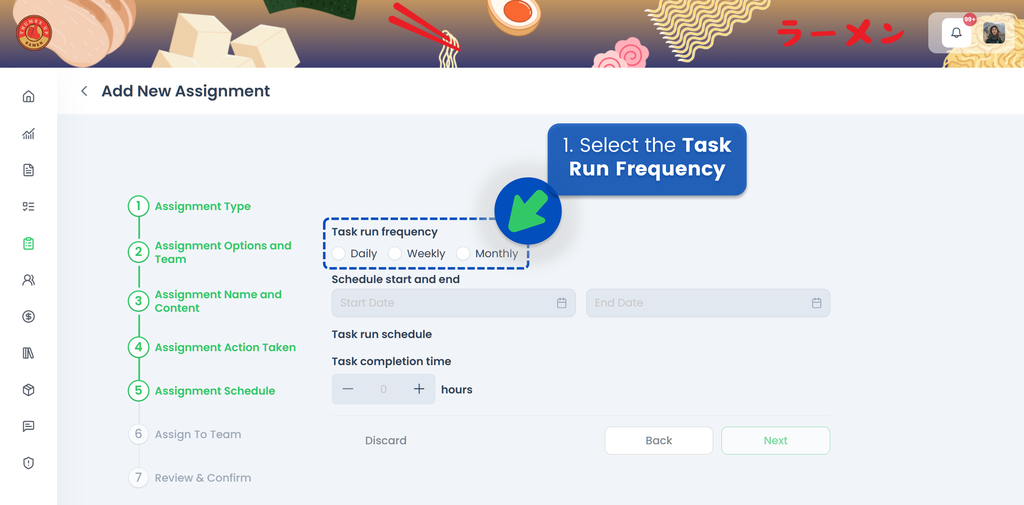
If you choose to Schedule your workflow, the next step is to select the Task Run Frequency, whether it's Daily, Weekly, or Monthly.
Watch the video below to understand how to set the scheduler,
🟢 Daily
- Select Daily for ther Task Run Frequency
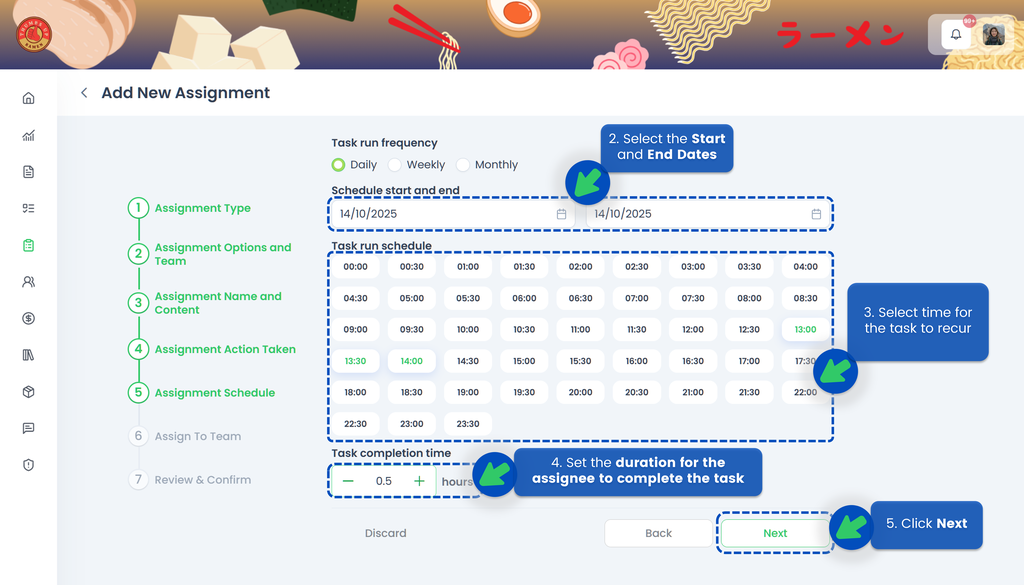
- Select the Start Date and the End Date of the assignment so the system knows when the task should become active and when it should end
- Select time for the task to recur
- Set the duration for the assignee to complete the task. If the assignee misses the deadline, the task will be automatically closed, and the system will indicate that the task was not completed on time
- Click Next
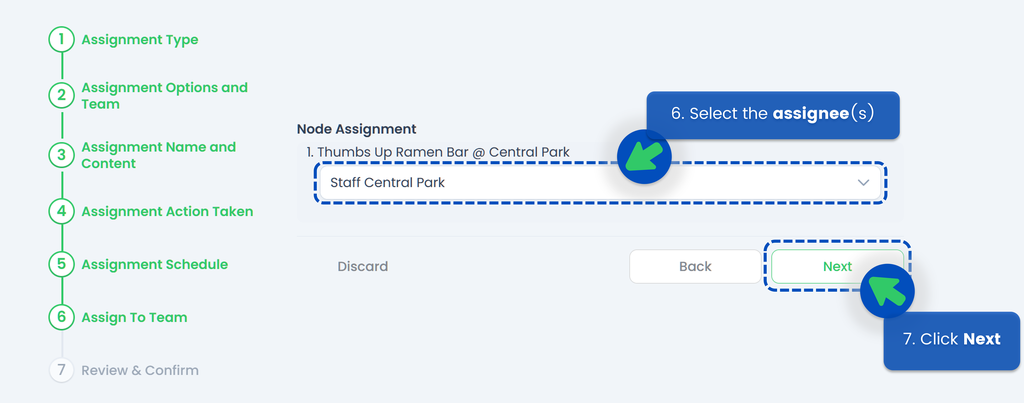
- Select the assignee(s)
- Click Next
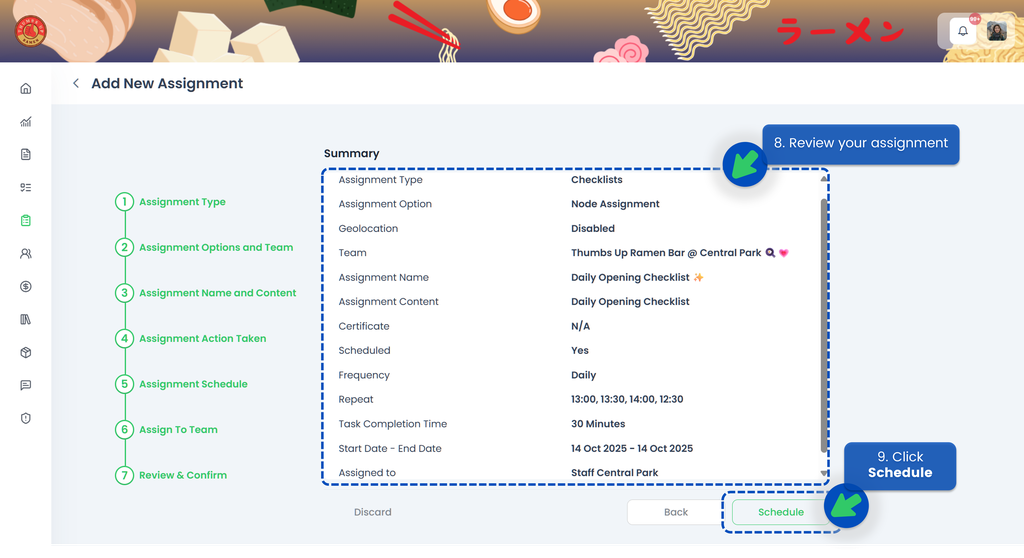
- Review your assignment. Make sure you’ve selected the correct start and end dates, timings, and assignee
- Click Schedule
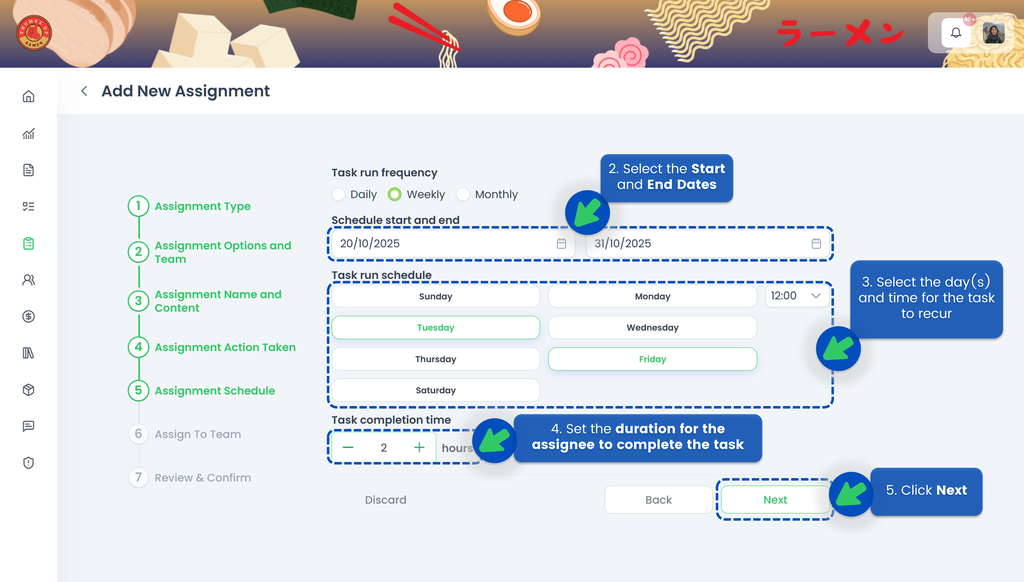
🟢 Weekly
- Select Weekly for ther Task Run Frequency
- Select the Start Date and the End Date of the assignment so the system knows when the task should become active and when it should end
- Select the day(s) and time for the task to recur
- Set the duration for the assignee to complete the task. If the assignee misses the deadline, the task will be automatically closed, and the system will indicate that the task was not completed on time
- Click Next
- Select the assignee(s)
- Click Next
- Review your assignment. Make sure you’ve selected the correct start and end dates, timings, and assignee
- Click Schedule
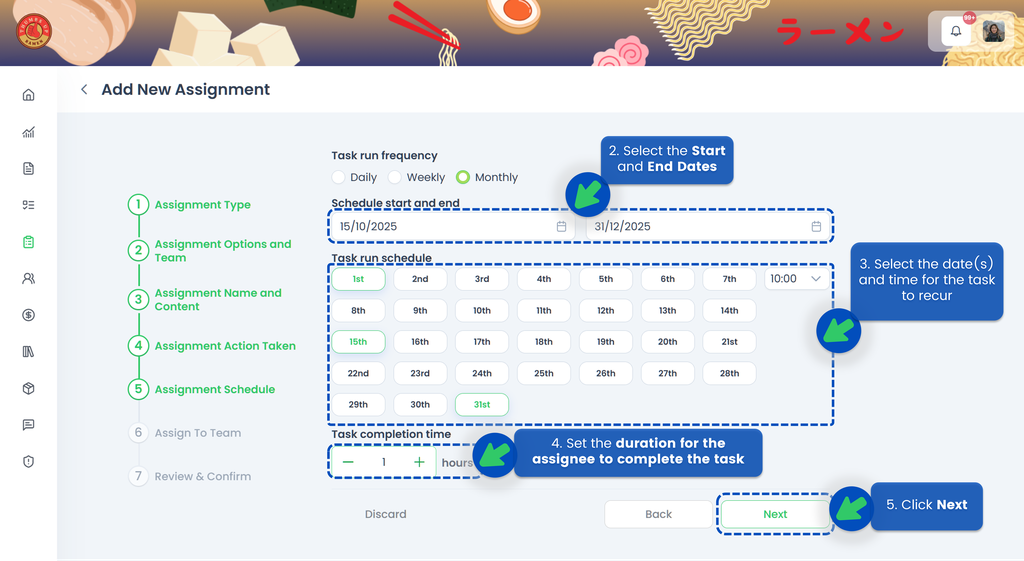
🟢 Monthly
- Select Monthly for ther Task Run Frequency
- Select the Start Date and the End Date of the assignment so the system knows when the task should become active and when it should end
- Select the date(s) and time for the task to recur
- Set the duration for the assignee to complete the task. If the assignee misses the deadline, the task will be automatically closed, and the system will indicate that the task was not completed on time
- Click Next
- Select the assignee(s)
- Click Next
- Review your assignment. Make sure you’ve selected the correct start and end dates, timings, and assignee
- Click Schedule
💡 If a month does not have 31 days, the task will be created on the last day of that month. For example, if a task is scheduled to recur on the 31st of each month, the task for February will be created on the 28th.