Assigning a File Upload Task
Purpose:
Use a File Upload assignment when you need users to submit documents, photos, videos, or other files.
All uploaded files will be stored neatly in TreeAMS Drive.
This section covers:
- 📁 Before Assigning – Prepare TreeAMS Drive Folder
- 📝 Steps to Assign a File Upload Task
- 🛑 Cancelling a File Upload Task Assignment
📁 Before Assigning – Prepare TreeAMS Drive Folder
Before assigning a File Upload Task, make sure you have prepared the folder in TreeAMS Drive where users' uploaded files will be stored.
- Go to Desk. Learn how you can switch to Desk here!
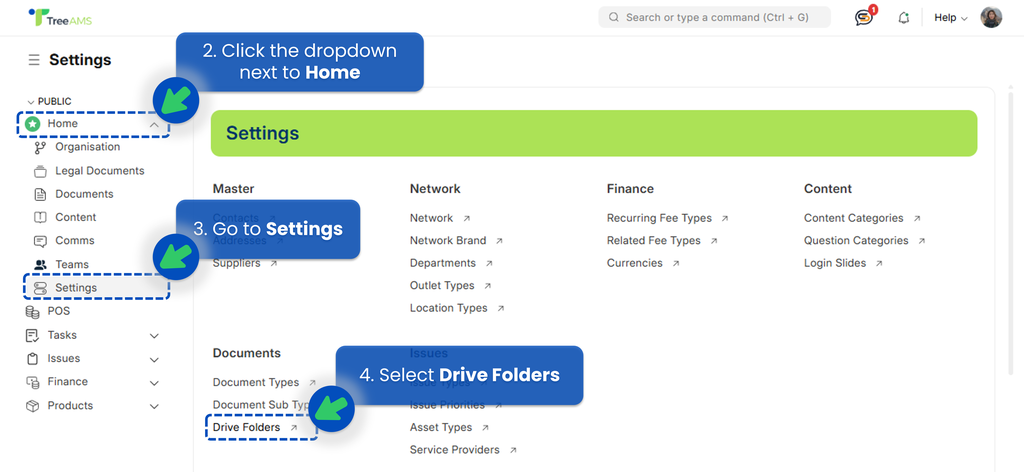
- Click the dropdown next to Home menu.
- Go to Settings.
- Find Drive Folders under the Documents Section.
- Click + TAMS Drive Folder to create a folder that will be used to store files for this task (e.g., Onboarding Documents, Training Certificate, Franchise Agreement).
- After clicking + TAMS Drive Folder, you will see a form like this:

- Folder Name 👉 Enter the name of your new folder. This is the only required field.
- Is Group (optional) 👉 Enable this if the folder should contain subfolders. Leave it off for a regular folder.
- Old Parent (optional) 👉 Select the previous parent folder if you're reorganizing. Otherwise, leave it empty.
- Parent TAMS Drive Folder (optional) 👉 Choose a parent folder to place this folder inside another. Leave empty to create a top-level folder.
- Once your folder is ready, you can proceed to create and assign the File Upload Task.

📝 Steps to Assign a File Upload Task
- In Step 3, enter the Assignment Name for your File Upload Task. For the preceding step, refer to This Link.
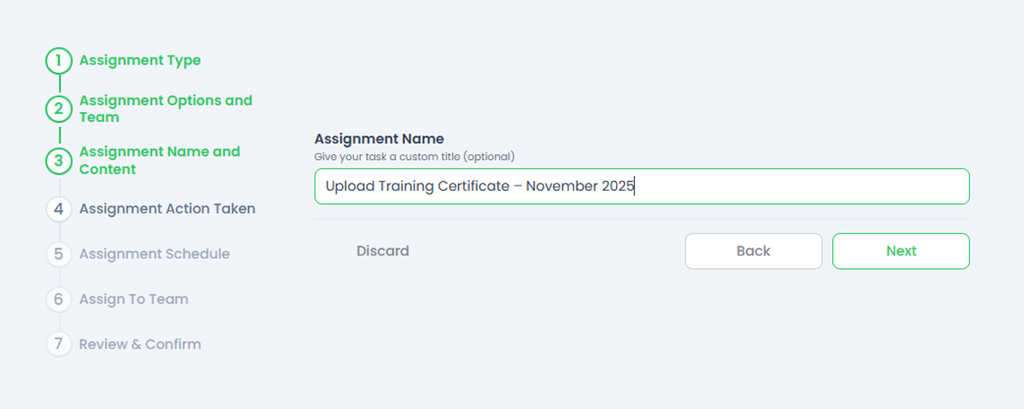
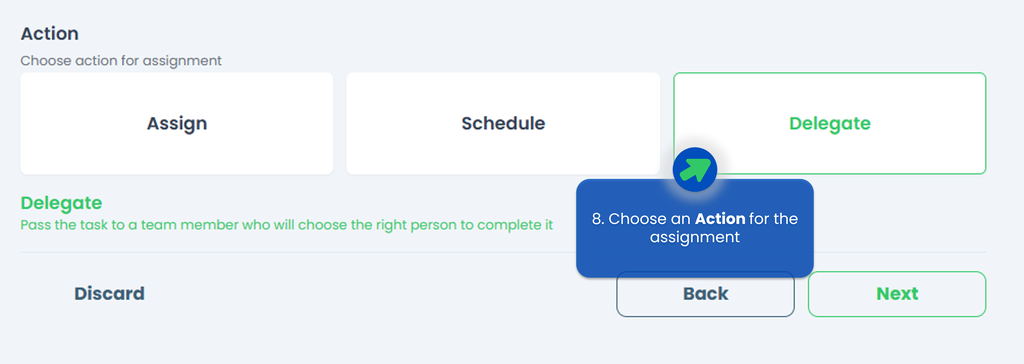
A File Upload Task lets users submit required files, which will be stored in TreeAMS Drive. Click Next to continue. - Select an action for how and when the File Upload Task will be assigned to the selected team or users, then click Next.
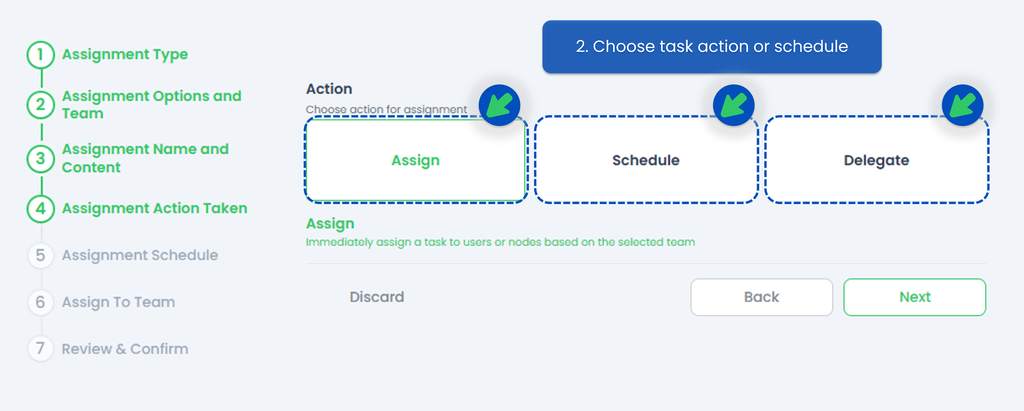
Please continue to the next step, which is either:
- Assign 👉 directly assigns the File Upload Task to the intended user(s). This is recommended when you already know who must submit the file.
- Schedule👉 create recurring File Upload Tasks, such as monthly document submissions or weekly photo uploads.
- Delegate👉 lets you pass responsibility to someone else to decide who should complete the File Upload Task. This is helpful when you're unsure which user should upload the file, but you know someone who can appoint the right person.
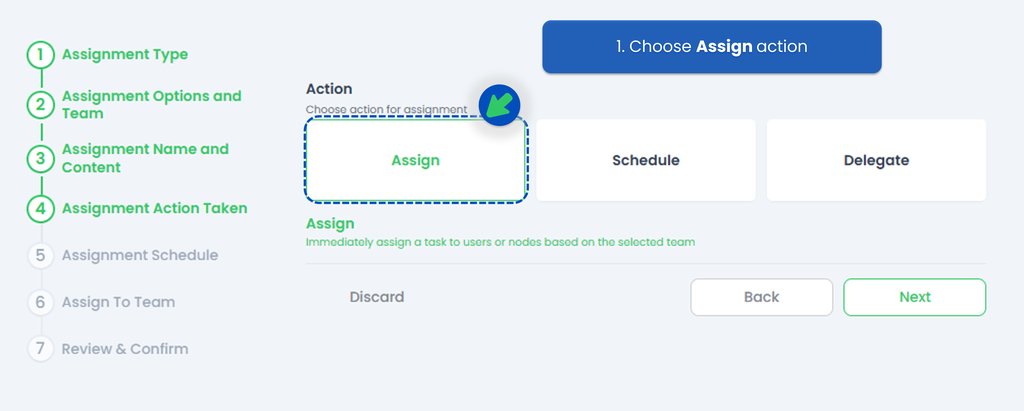
ASSIGN a File Upload Task
- In this step, choose the Assign action to immediately send the task to the selected user(s).
- Fill in the required fields under User Assignment:

- Reviewer – the person who will review or verify the submitted file.
- Assignee – the user responsible for completing the File Upload Task.
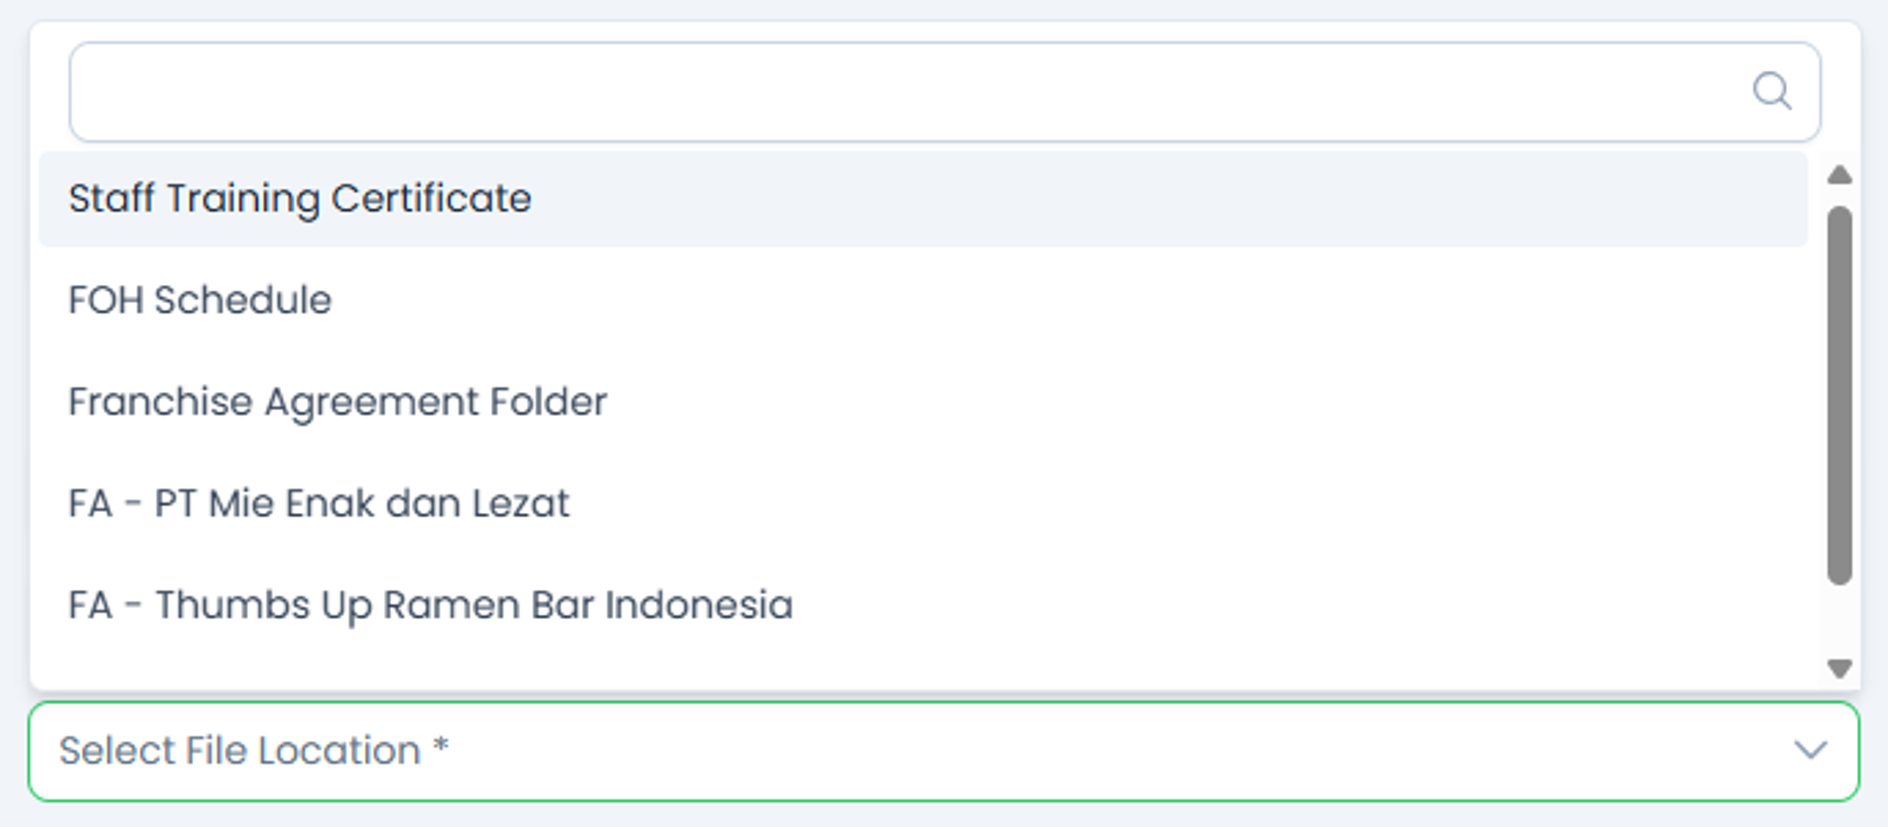
- File Location – select the folder in TreeAMS Drive where the uploaded file will be stored.
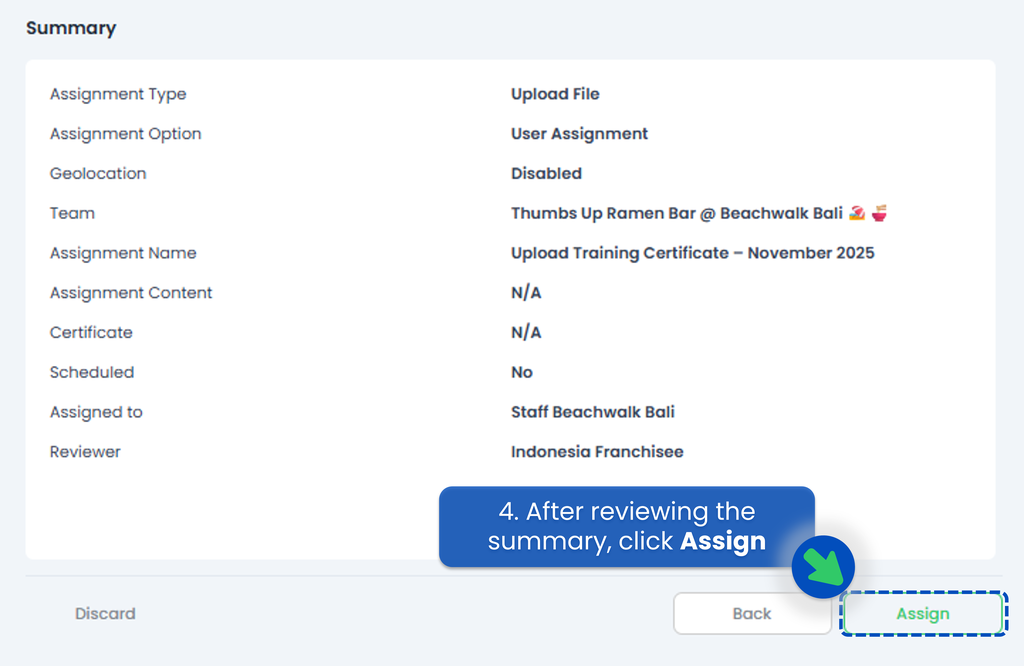
- Click Next to view the Summary of your assignment.
- Review all details to ensure everything is correct, then click Submit.
SCHEDULE a File Upload Task
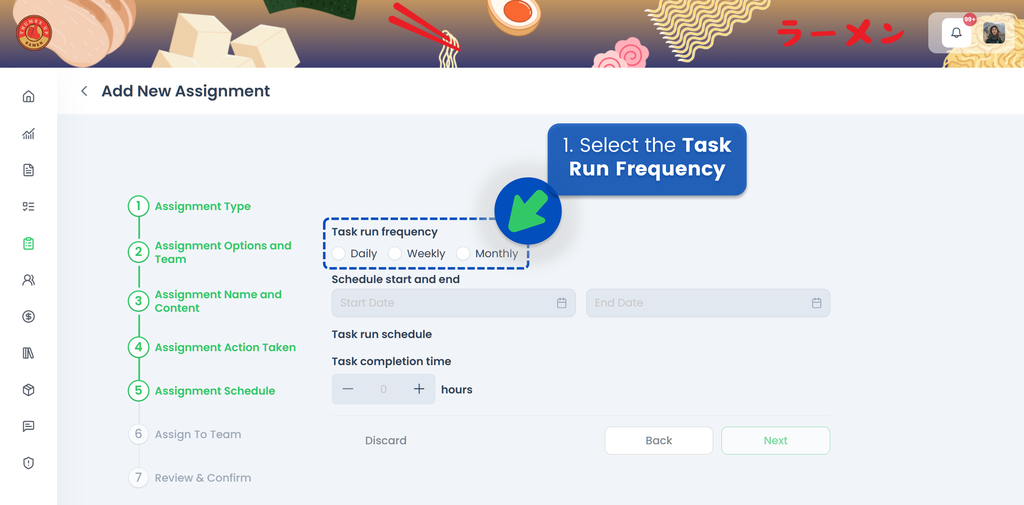
If you choose to Schedule your File Upload Task, the next step is to select the Task Run Frequency, whether it's Daily, Weekly, or Monthly.
Watch the video below to understand how to set the scheduler,
or read the guideline below.
🟢 Daily
- Select Daily for the Task Run Frequency.
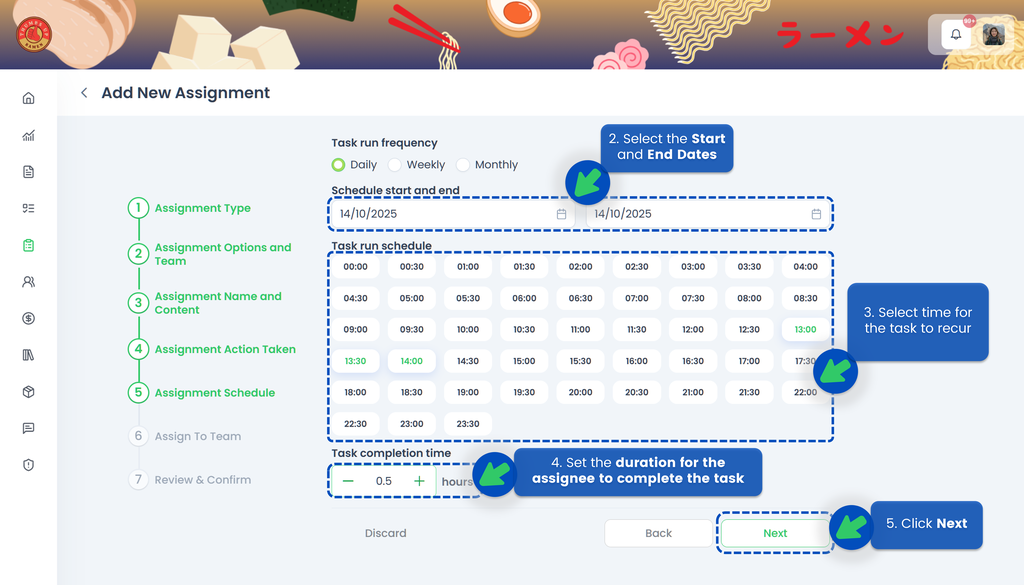
- Select the Start Date and End Date so the system knows when the repeating Task Upload File should begin and end.
- Select the time of day for the task to recur.
- Set the duration (time allowed for the assignee to upload the file). If the assignee misses the deadline, the task will automatically close and be marked as overdue.
- Click Next.
- Select the Reviewer, Assignee, and the File Location (the folder in TreeAMS Drive where uploaded files will be stored).
- Click Next.
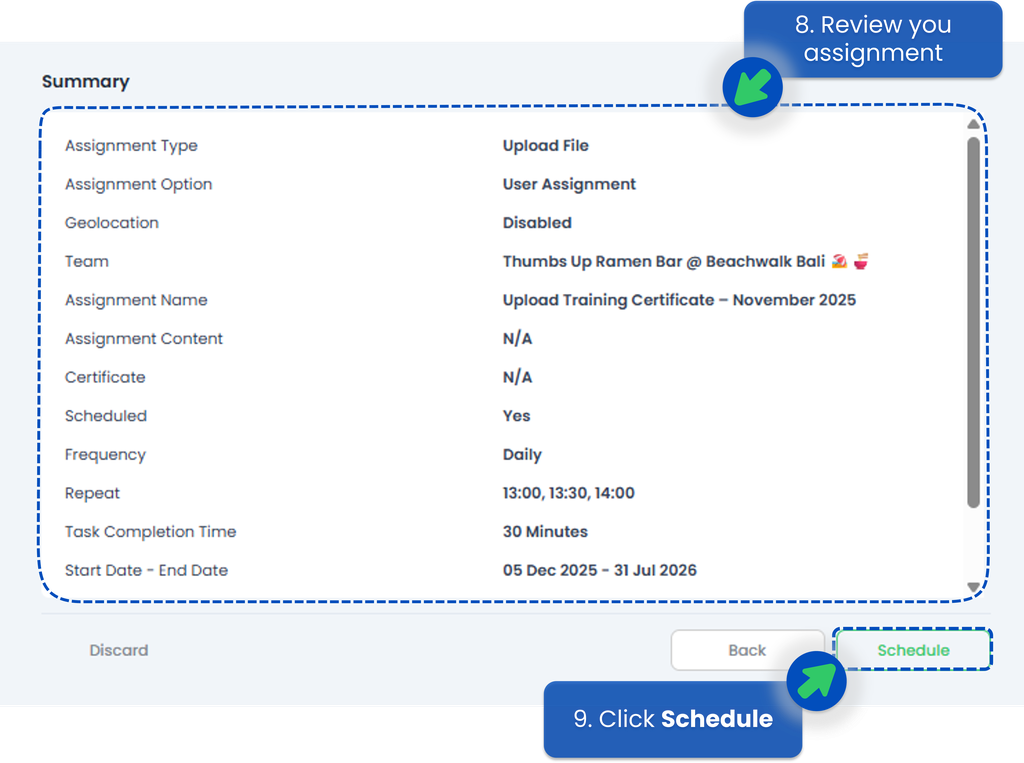
- Review your scheduled Task Upload File. Make sure the dates, time, and assignments are correct.
- Click Schedule.

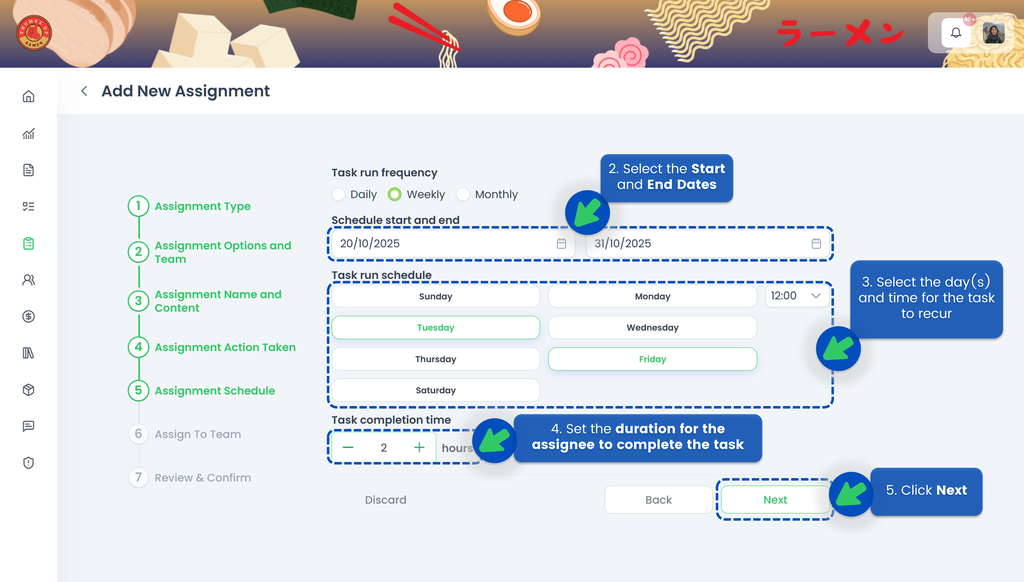
🟢 Weekly
- Select Weekly for the Task Run Frequency.
- Select the Start Date and End Date to determine when the schedule should activate and stop.
- Select the day(s) of the week and the time for the task to recur.
- Set the duration for the assignee to complete the task. If the deadline is missed, the task closes automatically and is marked as not completed on time.
- Click Next.
- Select the Reviewer, Assignee, and File Location.
- Click Next.
- Review all task details to ensure the recurrence pattern, timing, and assignments are correct.
- Click Schedule.
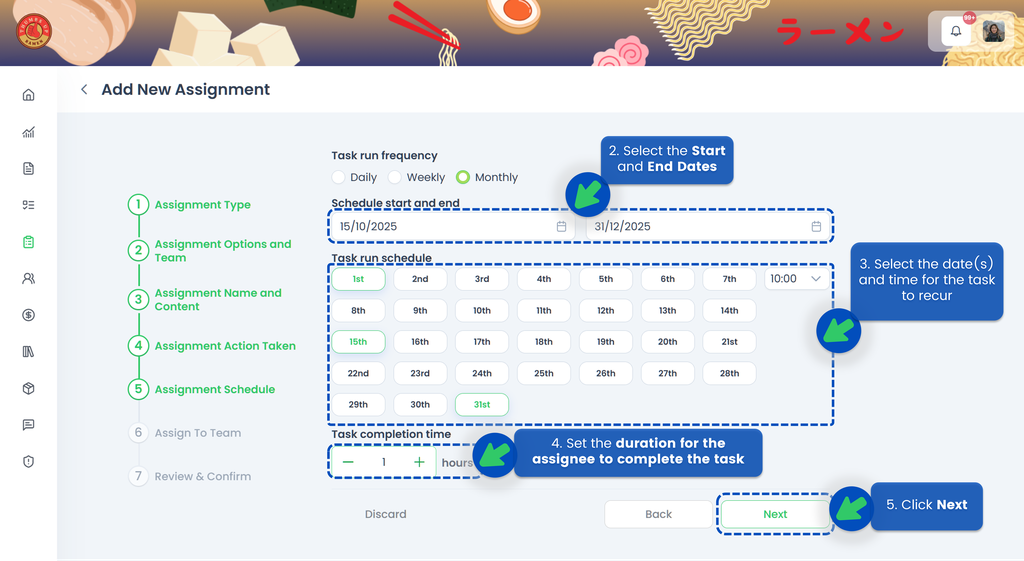
🟢 Monthly
- Select Monthly for the Task Run Frequency.
- Select the Start Date and End Date to define the active period for this scheduled Task Upload File.
- Select the date(s) and time for the task to recur.
- Set the duration for the assignee to submit the required file. If they miss the deadline, the system will auto-close the task and mark it overdue.
- Click Next.
- Select the Reviewer, Assignee, and File Location.
- Click Next.
- Review all details before scheduling. Double-check dates, time slots, and assigned users.
- Click Schedule.
💡 If a month does not have the selected date (e.g., 31st), the task will be created on the last day of that month.
DELEGATE a File Upload Task
-
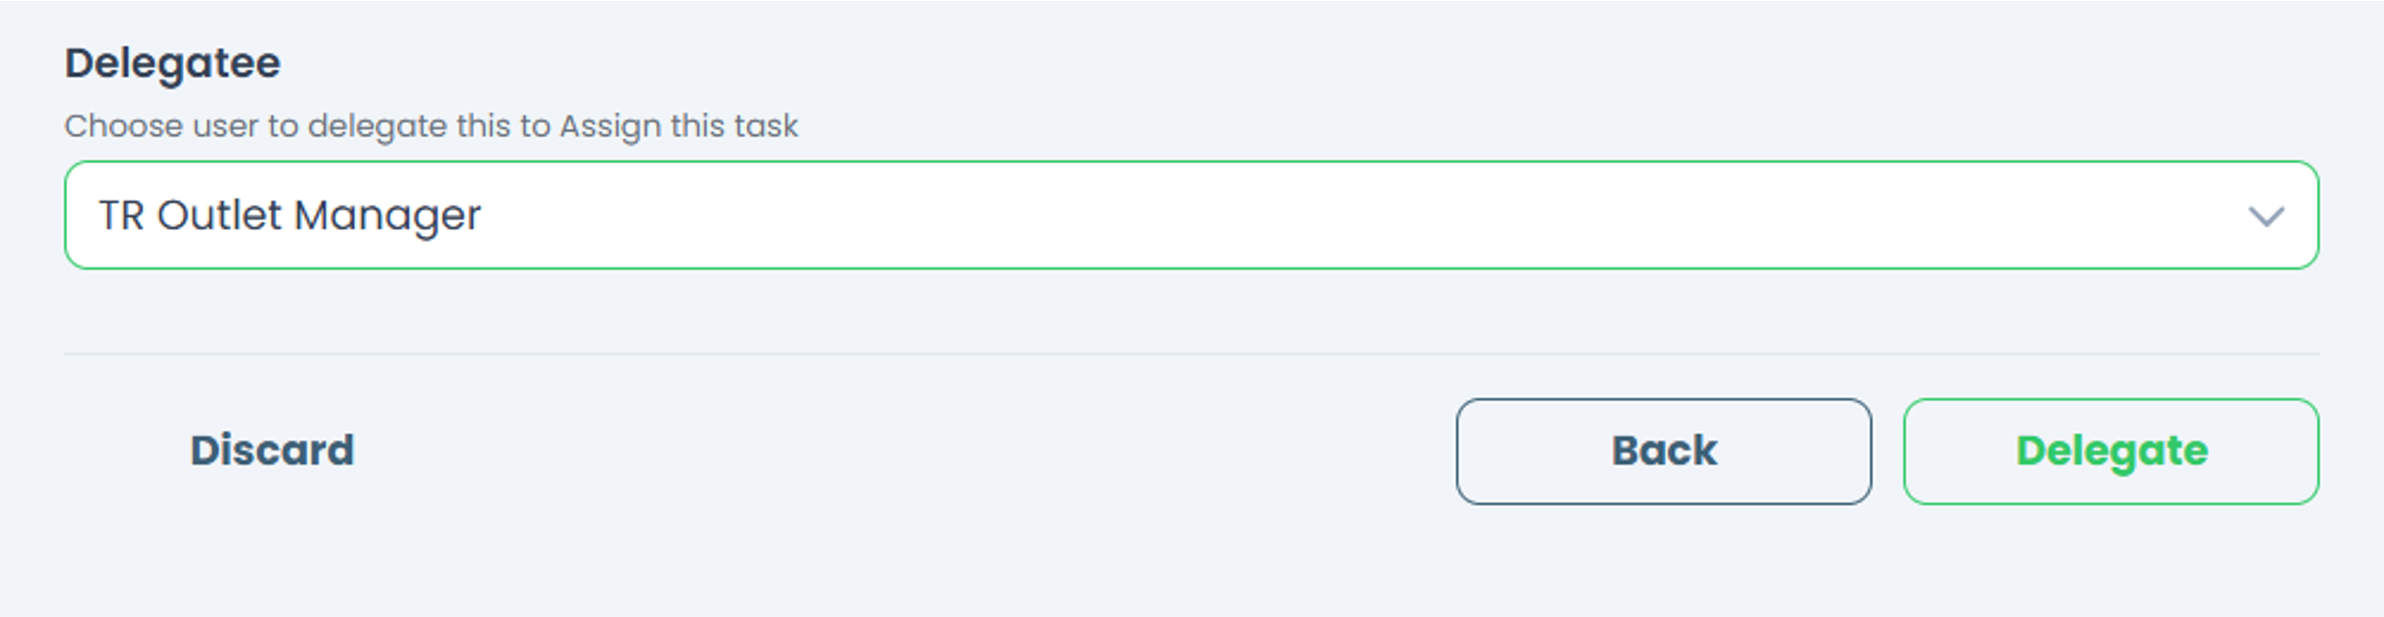
If you choose the Delegate action, you can assign the File Upload Task to someone who will decide the appropriate person to complete it. This is useful when you are unsure who should upload the required file — for example, the franchisee may delegate it to the store manager so s/he can assign the task to another responsible team member.
💡 You can only delegate one user for each assignment!IMPORTANT‼️ The Delegatee must be either a Site Admin or a Site User with the TreeAMS Assignment Manager sub-role. A Portal User cannot assign tasks — they are only allowed to complete them.
-
Click Delegate.
- Your File Upload Task has been successfully delegated!
🛑 Cancelling a File Upload Task Assignment
In TreeAMS, you can cancel File Upload Task assignments in various statuses, including draft, assigned, delegated, scheduled, and in progress.
Follow the steps below for detailed instructions:
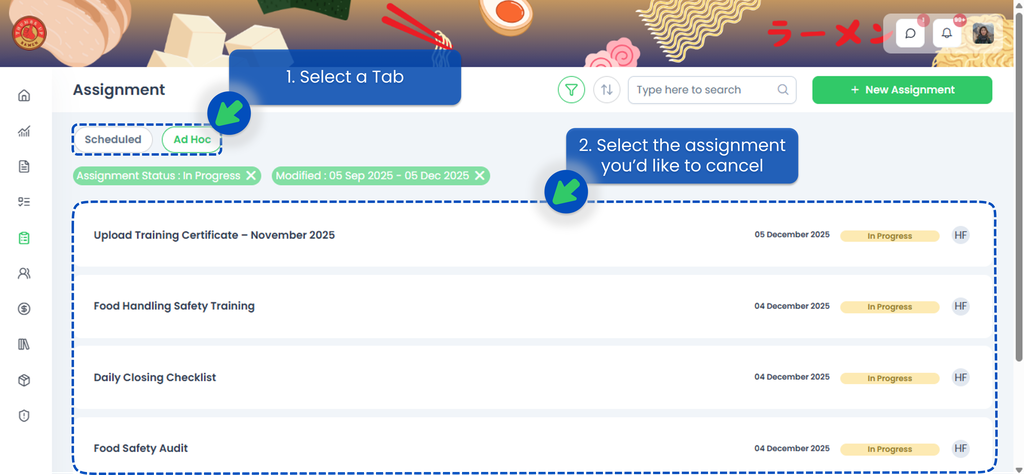
- In the Assignment menu, open the Schedule or Ad Hoc tab (depending on the action you selected when assigning the task).
- Select the File Upload Task assignment you want to cancel.
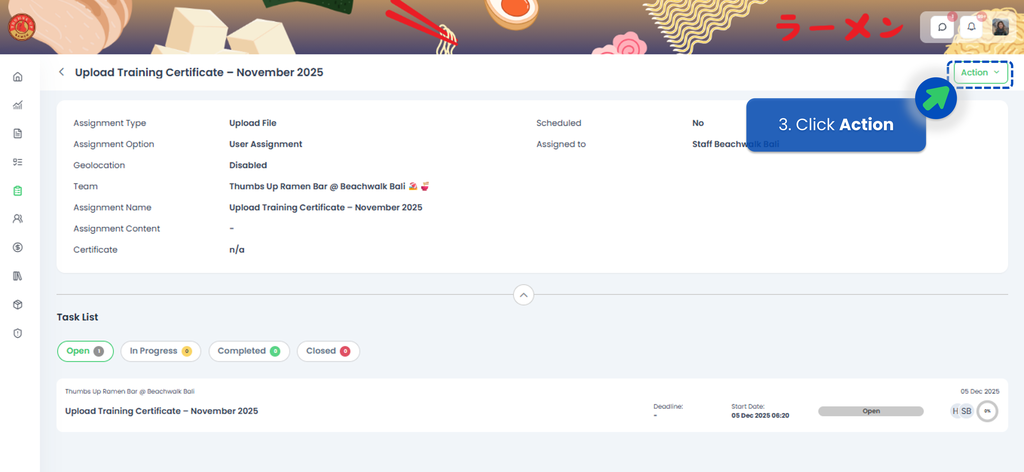
- Click Action. Depending on whether the assignment is Ad Hoc or Scheduled, you will see different options:
- For Ad Hoc File Upload Tasks, click Action button then select Cancel Assignment. This removes the assignment but keeps the File Upload Task content intact.
- For Scheduled File Upload Tasks:
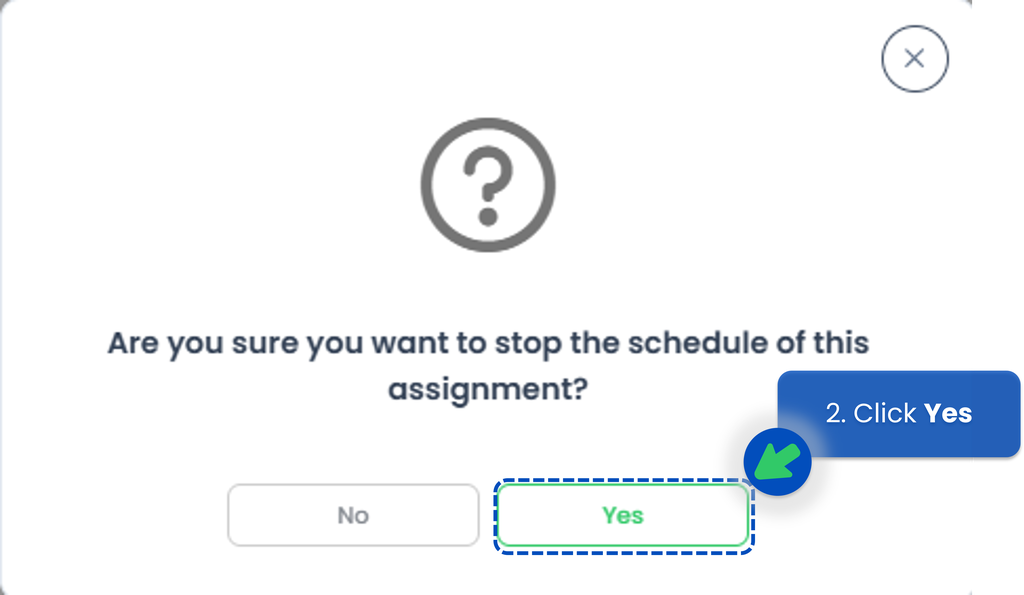
- Click Action button then select Stop Schedule.

- Click Yes. This stops future recurring assignments from being created.
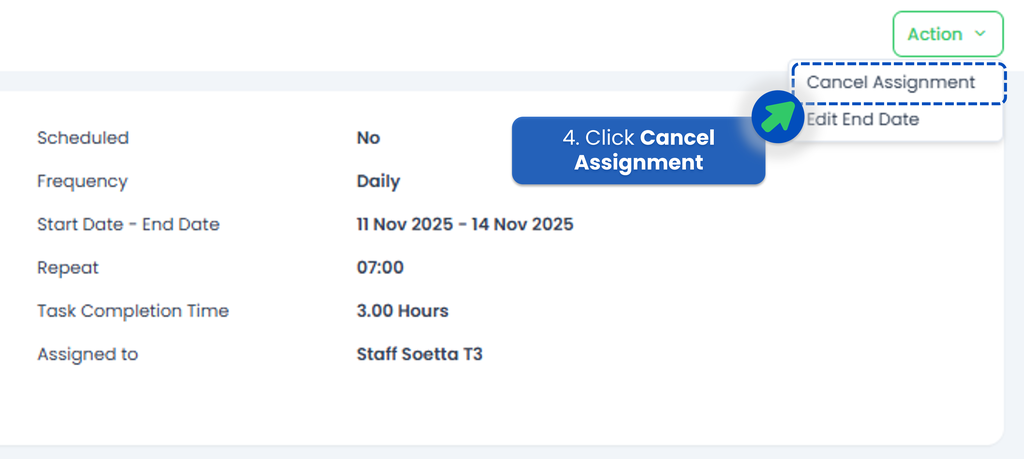
- Then we need to cancel the assignment, click Action button one more time.
- Click Cancel Assignment. This removes the assignment, but your File Upload Task content will remain saved in the system (TreeAMS Drive).
</li> - Click Action button then select Stop Schedule.
- For Ad Hoc File Upload Tasks, click Action button then select Cancel Assignment. This removes the assignment but keeps the File Upload Task content intact.
✅ Tips:
- Use clear titles such as “Upload Training Certificate – Month Year” so users know exactly what to submit.
- Organise folders in TreeAMS Drive (e.g., Onboarding Documents, Training Certificate, Franchise Agreement) to keep files easy to find.
- Combine File Upload tasks with Trainings or Workflows for onboarding or recurring processes.